Star Wars Genesis V5

THIS IS OUTDATED AND ARCHIVED. PLEASE DOWNLOAD THE LATEST VERSION FROM THE HOME PAGE INSTEAD. PLEASE ALSO LET ME KNOW WHERE YOU GOT A LINK TO THIS
- STEAM version of Starfield (No GamePass/Microsoft Support). DO NOT ASK FOR MY HELP WITH A PIRATED VERSION
- Version 1.12.36 of Starfield. PLEASE TURN OFF AUTOMATIC UPDATES for your sake and do NOT ever update until a newer version of Star Wars Genesis releases
- Microsoft Visual C++ Redistributable 14.40.33810.0 (Most PC’s have this but please make sure)
- Fresh Save (even V4 users) (NG+ does NOT count)
What is Wabbajack?
Wabbajack is an automated modlist installer. It will replicate my modlist and all it’s configurations with a portable version of Mod Organizer 2 on your PC. If you have premium on Nexus Mods, then this process is very easy and in just a few clicks, you can be downloading hundreds of mods at once. If you don’t have premium, it’s going to have you click through each mod to download but it’ll guide you exactly on which one to click. After that, it’ll still do all the load order/plugin configuration for you.

- Make sure Starfield is installed in the SAME drive you’re installing the modlist on.
- If you have any Creation Store mods, please uninstall ALL of them
- TURN OFF Automatic Updates for Starfield

- If you’ve modded Starfield at launch and/or with Vortex Mod Manager, you
probablydefinitely have lingering mods that will cause problems. Please uninstall Starfield through Steam, double check that both Documents\My Games\Starfield and steamapps\common\Starfield folders are deleted, then re-install
I am not joking. This is NOT Skyrim. Having just 1 mod that’s not supposed to be there can make the entire modlist break. For those of you who are interested, you find a mini-guide here on how to add additional mods to Star Wars Genesis safely.

- Create the following three folders at the root of your drive (e.g., C:, D:, or whichever drive you’re using). Previous users of my modlist should NOT install over their existing V4 modlist

- Download Star Wars Genesis V5.wabbajack and put it inside the COMPILER folder.
- Download the latest version of Wabbajack.exe from here and put it inside the WABBAJACK folder.
- In the WABBAJACK folder, run Wabbajack.exe to install it.
- After the install finishes, run Wabbajack.exe again to open it.
- Click the gear icon (settings) on the top left, then logon to Nexus Mods. Even if you’re already logged in, log out and log back in. Trust me
- Go back to the Wabbajack Main Menu and select Install From Disk
- Match everything to this (remember the drive letter like K, C, etc should match yours, not mine):

- Start the install. if you don’t have Nexus Premium, then Wabbajack makes you click through each mod. if you do have Nexus Premium, then Wabbajack downloads each mod automatically for you.
- Wait for the install to finish.
Note: If you encounter any installation errors, please read what the error is on the left-hand side and consult the FAQ, or take a picture of it and send it to the help section of my Discord.

- Go to Documents\My Games\Starfield and place the StarfieldCustom.ini file – in there.
Note: If you don’t see a folder like that, you likely have it on your OneDrive instead. Otherwise, if this is a fresh install of Starfield and you’ve never played it before, launch the game through Steam atleast once, close it, and try this step again.
- Launch ModOrganizer.exe in the Star Wars Genesis V5 folder. You will get a popup asking about nxm links. Click Yes.
Note: If ModOrganizer.exe is failing to open or is missing, then simply refer to the solutions in my F.A.Q.

- Launch the game by selecting SFSE at the top right side and clicking Run. Do not panic if this takes awhile. It is normal for it to take a few minutes for the first time.
- After starting a new game and creating your character, you must save and then fully restart your game after the Alternate Start popup window to fully finish your install. Otherwise you will have sound and animation issues.
Note: If the Alternate Start popup window isn’t appearing, simply open and close your inventory or some other menu.
- Many of your graphics settings have probably reset. There are some graphics setting you should configure regardless of your PC specs:
- Motion Blur – OFF
- Film Grain – OFF
- VSync – OFF
- Upscaling – OFF (unless youn really need it)
- Show Damage Numbers – OFF (for immersion)
- Dialogue and General Subtitles – ON (under Accessibility)
- Music – ON (under Audio Settings)
- Normal Difficulty
- Keep in mind that for ever jetpack you equip, you must press F1 to turn it into a proper jetpack that can hover. If this doesn’t work, please refer to the instructions in the FAQ
- Mentioning it one more time. Disable automatic updates for Starfield on Steam.
Note: If you are for some reason trying to load the modlist into an existing save, then I will not offer further support to you beyond what’s in this page here.

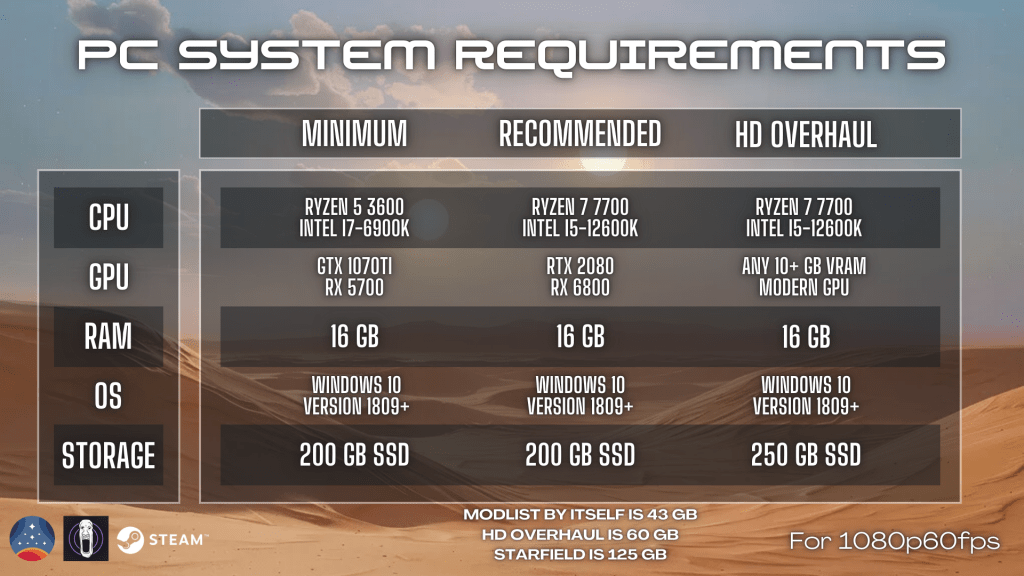
This amounts to 100+ GB of 2-4K textures and will lead to performance issues if you have a weak PC. MANUALLY DOWNLOAD these files and put the BA2 inside each archive in the steamapps\common\Starfield\Data folder.
- Parts 1 – 15
- Texture Patch
Note: DO NOT USE MOD ORGANIZER 2 TO INSTALL THESE OR ELSE YOU WILL HAVE CRASHES AND COUNTLESS BUGS
Your Data folder should have ALL these files in there like this this: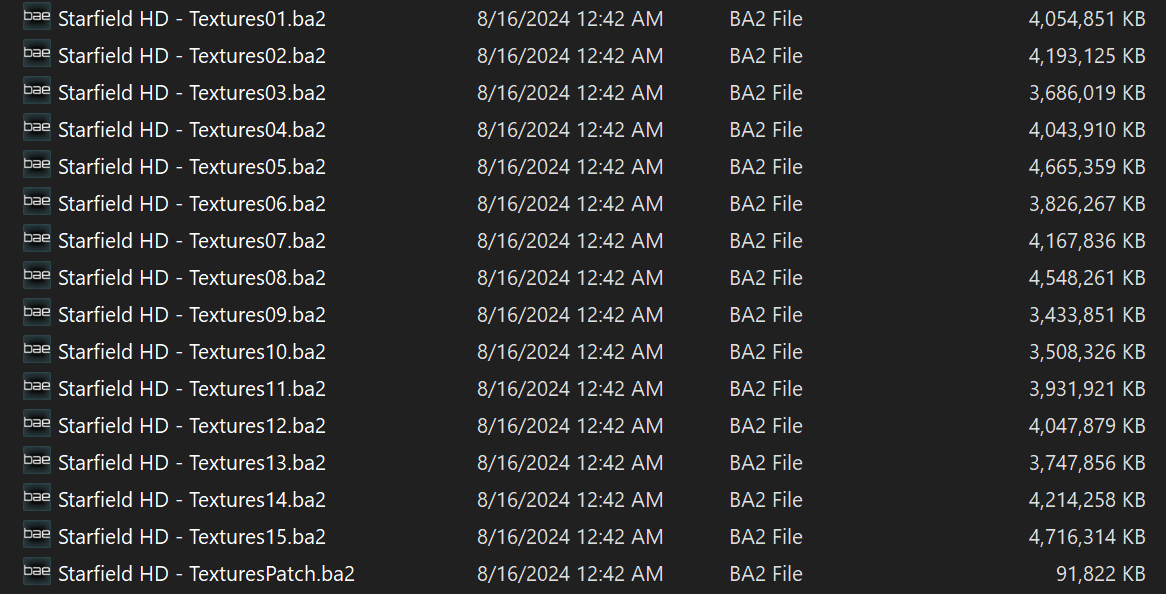
The next step is to download the Modified Starfield.ini and replace the existing one in your steamapps\common\Starfield directory.
After that is the final step of deleting everything in your Overwrite directory in Mod Organizer 2 (at the bottom of your modlist)
You are done and now ready to launch the game.

- If you’re finding the game too hard (especially in the beginning), you can increase your health by 50 or 100 with console commands to make it more doable. The command for that is:
- player.modav health 100
- If you’re finding the game too easy after leveling up and getting proper armor/weapons, you can revert that above change by running this command:
- player.modav health -100
