Star Wars Genesis 8.7.0
Installation Guide
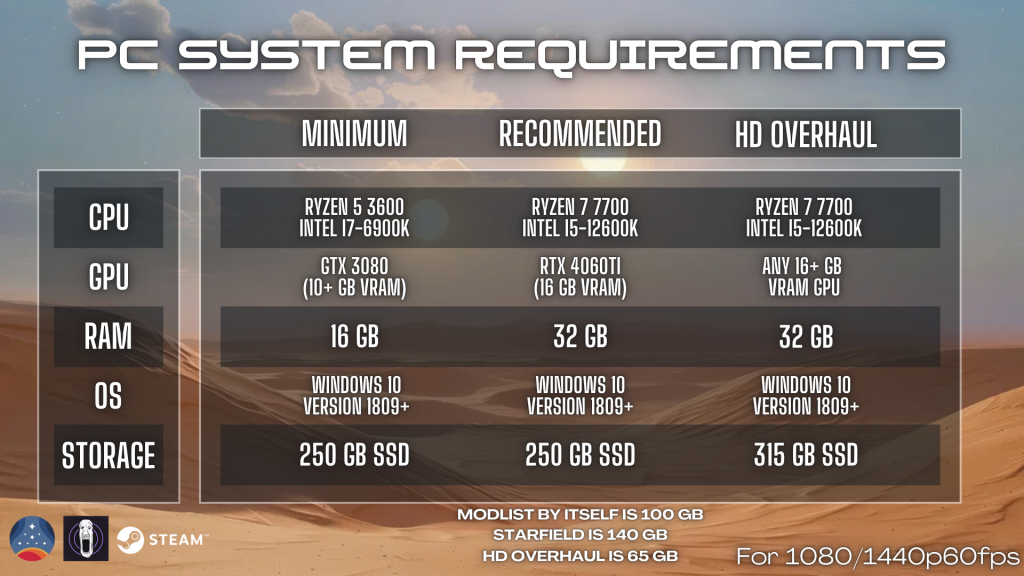
Star Wars Genesis is NOT a complete experience yet. In its current state, the project offers approximately 15–25 hours of structured story content, alongside an additional 10–20 hours of progression-focused gameplay centered on unique gear, crafting systems, exploration, lightsabers, and Force abilities. At present, Genesis should be understood as a short, self-contained narrative paired with an open-ended sandbox, rather than a fully realized Star Wars RPG.
The primary story content currently available consists of the Rebel and Imperial questlines, as well as a few side quests. Beyond the core narrative, players can engage with a Star Wars–themed sandbox experience featuring dozens of new and reimagined locations, expanded gameplay systems, and numerous mechanical enhancements. With each major update, players can expect the addition of multiple side quests, along with further content expansions, new features, and ongoing gameplay improvements. You can follow our progress here.

- STEAM version of non-pirated Starfield (No GamePass/Microsoft Support)
- Shattered Space Expansion (this is a paid DLC)
- Version 1.15.222 of Starfield (latest version)
- Microsoft Visual C++ Redistributable 14.40.33810.0+ (Most PC’s have this but please make sure)
- New Save (meaning that you install Star Wars Genesis first, and THEN start a new game)
- Language set to English otherwise none of the text replacement mods will work. Check for translations on NexusMods
- The ability to read this guide all the way to the bottom
What is Wabbajack?
Wabbajack is an automated modlist installer. It will replicate my modlist and all it’s configurations with a portable version of Mod Organizer 2 on your PC. If you have premium on Nexus Mods, then this process is very easy and in just a few clicks, you will be downloading hundreds of mods at once. As of September 2025, NexusMods is offering a free 3 day trial of premium. Just don’t forget to cancel it once you’re done.
If you’ve already used up that trial and don’t have premium, it’s going to have you click through each mod to download but it’ll guide you exactly on which one to click. After that, it’ll still do all the setup for you. As of 8.4, Genesis has about 320 mods.

If you have modded Starfield at all in the past (even if you uninstalled it after), then please click here. Especially if you used Vortex Mod Manager or the Creation Store. Failing to do so will either cause you to instantly crash or corrupt your valuable save.

These steps are all mandatory. Please read through them carefully. You could waste the next 1-2 hours if you don’t.
- Increase your page file to at least 80 GB. Very important for performance and stability.
- If you have any 3rd party Antivirus running, then please disable it during this process. If you specifically have BitDefender, McAfee, or Norton, then please click here.
- If you use any sort of performance/overlay/audio application, please refer to this list of incompatible applications.
- If you are using any VPN, please disable it. Many people have reported their VPN blocks access to download some files.
- Make sure Starfield is installed in the same SSD drive you’re about to install the modlist on.
- TURN OFF Automatic Updates for Starfield. This Steam setting will make it so launching the game through Mod Organizer 2 will not cause it to get updated.

Again, please make sure you do not have old mods leftover. Your game will instantly crash due to their conflicts. Or even worse, your game will not crash and you’ll be playing a bugged save for a few hours until you realize, and then you’ll have to start over.

- Before you do anything, please launch Starfield at least once through Steam and then exit out of it.
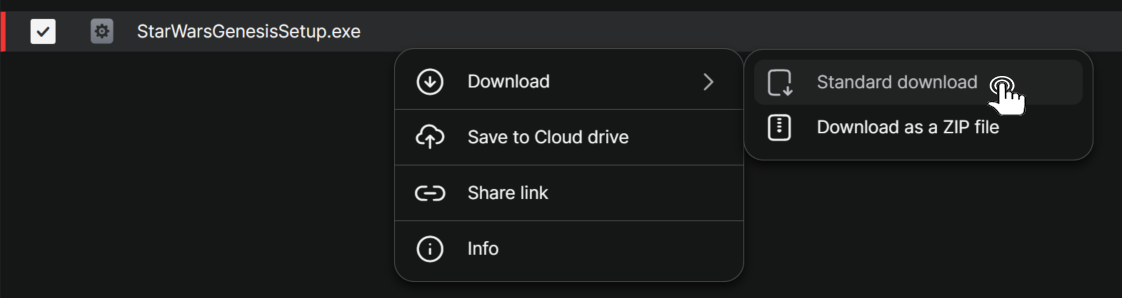
- Download StarWarsGenesisSetup.exe as a Standard Download (not zip) and run it. If it doesn’t work, try the mirror link. If neither work, try a different browser or turn off your VPN and any other security extension you may have installed.
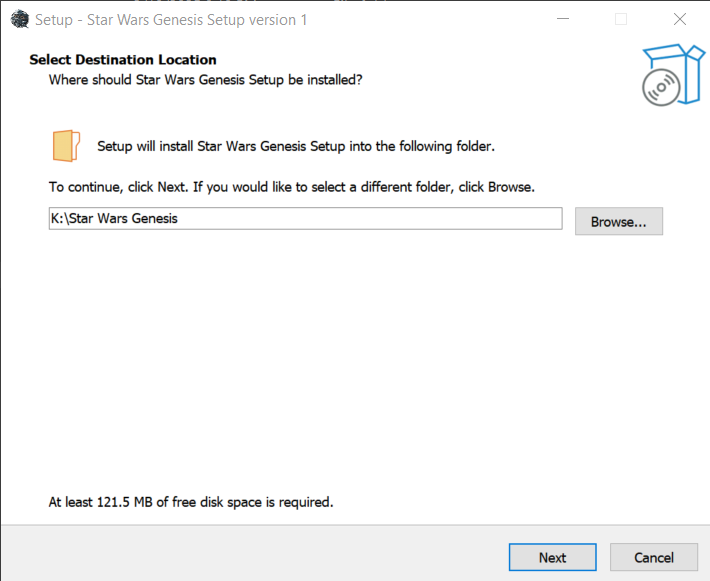
- The install location should stay Star Wars Genesis in your root drive. Do not move it. Do not rename it. Just make sure the drive letter is the same as your Starfield one. If you install this anywhere else, it will not work and I won’t help you.
- Once the install is complete, Wabbajack should open and update to the latest version automatically.
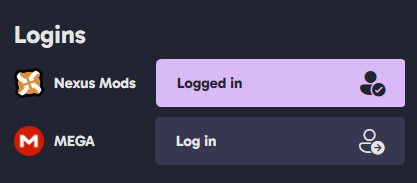
- Click the gear icon (Settings) on the bottom left of Wabbajack, then logon to Nexus Mods. If you already have the Wabbajack app from a previous modlist and are logged into Nexus, then please save yourself from a headache by logging out and logging back in. If you don’t do this, then every mod will fail to download.
- Click Browse Lists on the left side of Wabbajack, and then click Install From Disk at the top right. Navigate to the \Star Wars Genesis\Compiler folder and select Star Wars Genesis.wabbajack
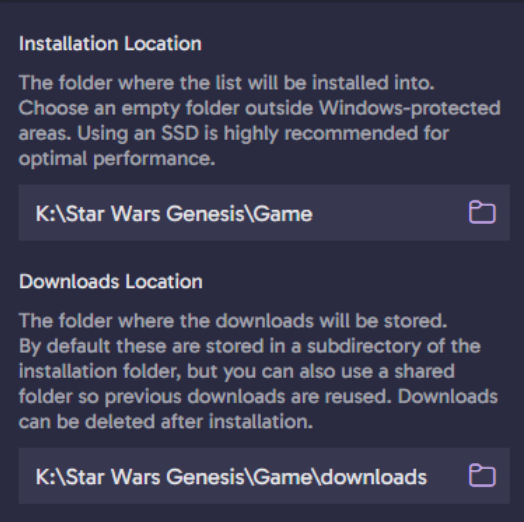
- The Installation Location should be set to the Star Wars Genesis\Game folder. Too many people select just the Star Wars Genesis folder. Do not be one of those people. And remember the drive letter (K, C, etc) should match yours, not mine.
- Start the install. If you don’t have Nexus Premium, then Wabbajack makes you click through each mod.
Wabbajack is a smart installer. If you have to close it for any reason during the install (such as a stuck download or simply wanting to pause), then simply re-open Wabbajack, follow Steps 6-7 again, and it’ll resume where it left off.
Note: If you get a download failed late into the install and you’re SURE you’re logged into Nexus, just click retry. The Nexus servers have been terrible lately. For any other errors or issues, refer to the Wabbajack FAQ. There is a fix for literally every Wabbajack issue in there.
- After the install finishes, go to the \Star Wars Genesis\Game folder and run GENESIS_DOCUMENTS.bat. You will be asked a question that you will have to answer Y or N to.

DO NOT SKIP THESE STEPS
- You are now ready to launch the game! Simply launch ModOrganizer.exe in the \Star Wars Genesis\Game folder. If you get a popup asking about nxm links. Click Yes.
Note: If ModOrganizer.exe is missing , then please refer to this page. If ModOrganizer.exe is failing to open, then please refer to this page
- At the top right of Mod Organizer, select SFSE in the dropdown and launch it. Do not panic if this takes awhile. It is normal for it to take a few minutes for the first time. It does not matter if you click Unlock or not. The game will launch regardless.
Note: If you encounter a plugin or SFSE error popup, then please refer to this page
- If this is a fresh install of Starfield, then I recommend you restart your game once after reaching the main menu. Otherwise your mods won’t properly load in.
Note: If you are having LAUNCH issues such as Starfield crashing on startup or weird popups, then please refer to this page
- If you have a controller or an ultra-wide monitor, click the options below. Please don’t be an idiot and skip this step. You will literally not be able to save on a controller.

- After starting a new game, you will get a popup asking about achievements. Click Yes. You will soon spawn in Coruscant and can choose your starting area and loadout
Note: If you spawned in a mining shaft/cave (the vanilla Starfield intro), then follow the steps here. You missed a step.
- After creating your character, open your inventory once (the “I” keybind), close it, and then save your game. Now restart and load back into that save. This will fix the sound and blaster issues.
- Your settings are automatically configured after installing. They are either set to medium or max depending on the choice you made when running the GENESIS_DOCUMENTS.bat file. You are free to adjust the graphics settings as you wish regardless of your choice but please be aware of the recommended Genesis settings as messing with some stuff like V-Sync, Dynamic Resolution, Dialogue Camera, DLSS, and Framegen; can cause crashing, infinite loading, and other general instability issues.
- Make sure Auto-HDR is OFF to ensure the best lighting quality. You don’t have to turn off HDR. Just the Windows 11 Auto HDR feature.
If you are experiencing any performance issues, specifically after pausing and unpausing the game. please refer to here.
Need to Know
- While you can play at any muscle/weight you want, it is generally recommended to play at default for minimal armor clipping.
- Do not rely on just autosaves. Manually save every now and then incase you run into any bugs.
- The Yuuzhan Vong main story will be heavily remastered in the next update, replacing the current main cast and related non-Vong characters. For now, Force powers can only be obtained through the existing version of this questline, which may contain more immersion-breaking moments than the newer Imperial and Rebel questlines.
- Stuck somewhere? Use this command to unstuck yourself: coc CityNewAtlantisLodgeInt
- If your ship becomes unresponsive (Inaccessible/Docking issues), try restarting your game or switching to another ship.
- Workbenches DO NOT have armors available to be crafted for free! This is an immersion focused experience, not an arcade.
- Planning on playing multiple characters? Read this.
- Disable automatic updates for Starfield on Steam. When Starfield gets updated, Genesis is unplayable without getting updated alongside it, which can take weeks.
Note: If you are for some reason trying to load the modlist into a non-Genesis save then I will not offer further support to you beyond this website.

The default HP of new characters is 200. This is considered Normal Difficulty. Genesis is hard by nature due to the realistic damage overhaul and unleveled world. But it is also lore accurate. You are not meant to fight elite bounty hunters and mercenaries at level 1 unless you are very smart about it. Visually, you’ll be able to tell what enemies are easy/hard to kill based on the armor they’re wearing. Kill easy enemies or be tactical against hard ones, make credits, buy better armor, get stronger, etc. This is a sandbox at the end of the day. There are multiple paths to success. I’ve had so many people in Discord complain the game was too hard and then 2 hours later tell me it’s the best progression experience they’ve had in a game. Be patient with it, learn the systems, and it’ll be rewarding. Remember to not adjust the ingame difficulty or else it will results in sponges. Resort to these console commands instead:
| Difficulty | Health Amount | Console Command to be Used (` key) |
| Gaming Journalist | 3000 | player.modav health 2800 |
| Story Mode | 1000 | player.modav health 800 |
| Beginner | 400 | player.modav health 200 |
| Casual | 300 | player.modav health 100 |
| Normal | 200 | N/A |
| Hard | 150 | player.modav health -50 |
| Very Hard | 100 | player.modav health -100 |
| Extreme | 50 | player.modav health -150 |

Star Wars Genesis is compatible with the most popular HD Overhaul mods for Starfield. The ones recommended for Genesis and used in my videos are all featured on this page and come with a simple install guide. Please be aware that these amount to 100+ GB of 2-8K textures and will lead to performance issues if you have a GPU with low VRAM. Don’t bother if you don’t at least have 16 GB VRAM or patience.

I highly advise you to make a copy of your entire Starfield folder at \SteamLibrary\steamapps\common\Starfield and store it someplace safe. This is a precaution for if you accidently update your game (whenever there is an update). All you would do is just delete everything in the actual Starfield folder and then copy these stored Starfield files into there. Bam. You now have downgraded back to the correct version and saved yourself a headache.
